http://www.galaxie-starwars.com/star-wa ... -t4297.htm
Some really nice photos of the mini bust, this is really helping me decide on the shape of the helm

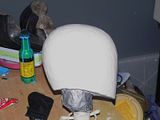
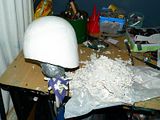
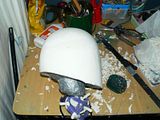
I am about to add a little more clay to the face and then will do a shell of FG and then remove the clay and back fill with expanding foam. My poor wig stand is just not holding up to all the weight of the plasticine and nor are my hands

Speaking of which, I do have progress! Much thanks to Matt for wielding hot knife and spending I think 2 hours cutting? I think it was at least that. Thank you, I do now have a new tip for my soldering iron that is able to be smacked into knife shape but 3.5mm styrene will never be easy to get through
That was 45 pieces of varying sizes and at least one nasty interior curve!
So photo progress!
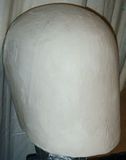
Helmet through the ages:
3/6/10
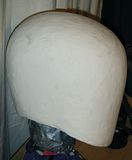
13/6/10
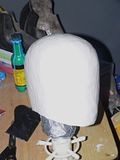
2/8/10
So quite a profile change
1.5kg clay put on then taken off
In theory I could have just shaved and shifted the existing clay but it really was much easier to add too much and cut it back.
My tools for this have been a heat gun to soften the plasticine and a big budget metal ruler to shave with. I knew that horrible sharp edge would come in handy
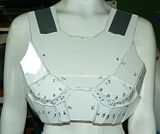
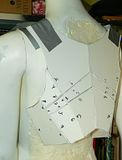
Armour progress:
Welding of styrene:
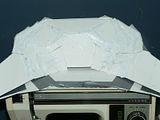
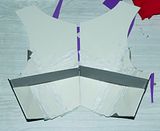
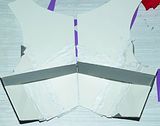
Styrene welded and needing heat shaping:
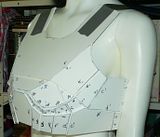
I only removed the melted edges on the bigger pieces but sanded down the smaller a little so that I could get that overlap of the upper and lower chest. All the gaps and uneveness will be fixed once the welding starts on the front. I have had success with this sort of process on the collar of my Samara costume though that is a much much smaller scale!
If the weld is thin enough in the back then heat shaping is a doddle as it acts a bit like a hinge I did add a bit much in some places, but luckily not where the shaping will need to occur. I'm going to give it another day or two as I remember the foamy mess I made when I was too eager to shape my Mara greaves...
Styrene glue is much fun, unless you have a cut on your hand in which case the acetone isn't so fun
I have been using a glass jar to snip my 0.5mm sheet styrene into (about 2 by 1cm pieces) and about 150ml of acetone. The acetone luckily is hardly used up in the process so I've been able to add more styrene each night to make more glue for the next day.
I've also been working on a Sabe battle outfit as a slight distraction- I'm quite looking forward to her headdress too
More plastic!


